• Home
  • Work
    • REJIG Lockdown Projects
    • Past Projects
  • Blog
  • Tutorials
Luckyfish Arts
  • Home
  • Work
    • REJIG Lockdown Projects
    • Past Projects
  • Blog
  • Tutorials

BLOCK OF THE MONTH

MARCH: DUTCH PUZZLE BLOCK

For this 16-block pattern you’ll need 8 squares of a light colour, and 4 squares each of colour A and colour B. These work well as strong contrasting colours. The “puzzle” is created from pairs of flying geese blocks, rearranged to form an eye-catching design.

(Extra credit: Listen to Alex Turner’s “Stuck on the Puzzle” to complete the puzzling effect!)

Note: When your pieces are ready to be sewn together, make sure to trim them all to the same size to ensure they fit together correctly.

1. ORGANISE AND CUT THE FABRIC YOU'LL NEED

Cut eight 4”x4” squares of your light colour

Cut four 4”x4” squares of colour A

Cut four 4”x4” squares of colour B

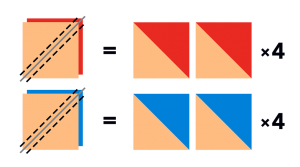
2. MAKE 16 HALF-SQUARE TRIANGLES

Pair up your squares so that each colour A and each colour B is together with a light square.

  • Pin the right sides of each pair together.
  • Rule a line from corner to corner using chalk or pencil. Stitch down either side using the edge of the machine’s presser foot as a guide.
  • Cut in between the sewn lines and press the seams to the dark side.
  • Repeat with all remaining pairs.

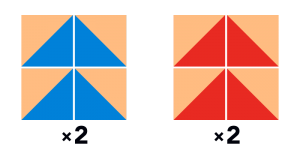
3. ARRANGE INTO FLYING GEESE, SEW IN SETS OF 2 AND GROUPS OF 4

Using the diagrams, lay out your squares into these groupings, and begin to sew them together.

Start with the top 2 squares of a group, stitching together and pressing the seams in one direction.

Next, stitch the bottom 2 squares of that same group, and press seams in the other direction.

Finally, stitch the 2 sets together, and press the seams to the dark side.

Repeat this process for the other 3 groups.

4. CREATE THE PUZZLE

Arrange your 4 sewn groups together as shown, so that all the geese are flying upwards.

Rotate block 2 90 degrees clockwise

Rotate block 3 180 degrees

Rotate block 4 90 degrees counter-clockwise.

This forms a pinwheel in the centre and a twisting puzzle around the outside (if you’re unsure what you’re aiming for, check your pattern against the finished diagram in Step 5).

5. SEW YOUR FINISHED BLOCK TOGETHER

Begin by sewing the top two blocks together, and press the seams in one direction.

Next, sew the bottom two together, and press in the other direction.

Finally, sew the two halves together, and nest the seams.

PREVIOUS TUTORIAL
NEXT TUTORIAL

Contact Us

Got a question? Send us a message, and we'll be in touch asap.

Send Message
Get REJIG news direct to your inbox Subscribe

About the Artist

Rosi Thornton is a visual artist based in Tyne and Wear. Her interests combine pattern, print, colour, and cloth, which she uses creatively in textiles, quilts, printmaking, and handmade books.

She believes passionately in recycling, skill-sharing, and art within communities, and started the REJIG project as a way of drawing these related interests together into a creative whole.

© 2025 · rejig.co