• Home
  • Work
    • REJIG Lockdown Projects
    • Past Projects
  • Blog
  • Tutorials
Luckyfish Arts
  • Home
  • Work
    • REJIG Lockdown Projects
    • Past Projects
  • Blog
  • Tutorials

BLOCK OF THE MONTH

FEBRUARY: DEPRESSION ERA BLOCK

For this pattern you’ll need 8 squares each of 2 colours, one light and one dark. However, in keeping with the origins of the pattern – named for the thrifty stitchers of Depression-era America – the fabric doesn’t all need to be the same.

You can use up to 8 different fabrics per “colour”, but it helps to keep them all in the same tonal family.

(Extra credit: Listen to Lena Horne bemoan the weather in this 1943 classic)

Note: When your pieces are ready to be sewn together, make sure to trim them all to the same size to ensure they fit together correctly.

1. ORGANISE AND CUT THE FABRIC YOU'LL NEED

Cut 8 4″x 4” squares of the light colour(s), and 8 4″x4″ squares of the dark colour(s).

2. MAKE 16 HALF-SQUARE TRIANGLES

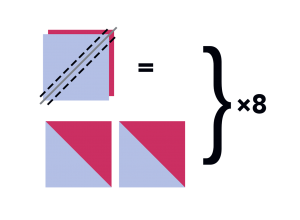
Pair up your light and dark squares so you have 8 sets (each containing one light and one dark).

  • Pin the right sides of each pair together.
  • Rule a line from corner to corner using chalk or pencil.
  • Stitch down either side using the edge of the machine’s presser foot as a guide.
  • Cut in between the sewn lines and press the seams to the dark side.
  • Repeat with all remaining pairs.

3. LAY OUT THE DESIGN

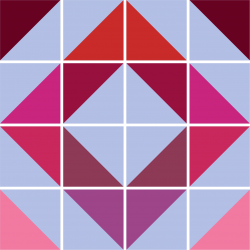
Using the diagram shown, arrange the squares so that the light and dark triangles form a pattern of concentric diamonds.

Start from the centre, creating a light diamond, and build up the dark diamond around it. Finish the outer light diamond by putting a dark triangle at each corner.

When you’re happy that all your pieces are in the right place and look good, take a photo! It alway helps to have a reference later on.

3

4. SEW THE SQUARES, WORKING IN SETS OF 2 AND GROUPS OF 4

Working in smaller sections helps to keep your edges accurate.

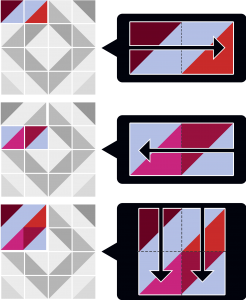
Start at the top-left-hand corner, and sew the first two squares together, pressing the seams together in one direction.

Next, sew the two squares underneath your completed set, and press the seams in the opposite direction.

Sew your two sets of two together, and press the seams down.

Repeat this process for the other squares, working around the pattern in sets of two and groups of 4. You will end up with 4 sewn pieces (of 4 squares).

5. SEW YOUR 4 PIECES TO MAKE A COMPLETED BLOCK

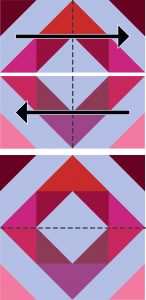
Sew the top two pieces together first, and press the seams in one direction. Next, sew the bottom two pieces together, and press the seams in the opposite direction.

Finally, sew the two halves together, nesting the seams.

PREVIOUS TUTORIAL
NEXT TUTORIAL

Contact Us

Got a question? Send us a message, and we'll be in touch asap.

Send Message
Get REJIG news direct to your inbox Subscribe

About the Artist

Rosi Thornton is a visual artist based in Tyne and Wear. Her interests combine pattern, print, colour, and cloth, which she uses creatively in textiles, quilts, printmaking, and handmade books.

She believes passionately in recycling, skill-sharing, and art within communities, and started the REJIG project as a way of drawing these related interests together into a creative whole.

© 2025 · rejig.co