• Home
  • Work
    • REJIG Lockdown Projects
    • Past Projects
  • Blog
  • Tutorials
Luckyfish Arts
  • Home
  • Work
    • REJIG Lockdown Projects
    • Past Projects
  • Blog
  • Tutorials

BLOCK OF THE MONTH

APRIL: THE DISAPPEARING 9-PATCH

This 9 patch block is incredibly easy to make, but gives a fantastic result. Cutting and rearranging larger blocks to form a more intricate design is a satisfying and relatively quick way to create interesting patterns across a quilt-top. Use a mix of colours and patterns for the best effect.

Note: When your pieces are ready to be sewn together, make sure to trim them all to the same size to ensure they fit together correctly.

1. ORGANISE AND CUT THE FABRIC YOU'LL NEED

Cut nine 6.5” squares from different fabrics, using a mix of colours and patterns for best results.

2. ARRANGE THE SQUARES IN A GRID

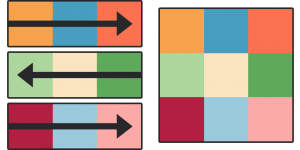
Take time to choose the best layout of colours and patterns in a 3 x 3 grid.

TOP TIP: The four corner squares will remain whole, so make sure they’re ones you like!

3. SEW INTO A 9-PATCH BLOCK

Stitch the squares together to form a 9-patch block.

Take it one row at a time, pinning and stitching the top row of three, then the second row, and finally the last. Press the seams in opposite directions on each row, as this helps them to neatly fit together.

Next sew the top row to the middle row, and then finally join the last row to the larger block.

4. PRESS TO CREATE CUT LINES

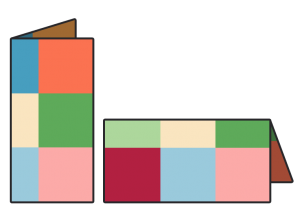
Press your block flat, then fold in half vertically and press a crease into the folded edge.

Unfold the fabric, and then refold, this time horizontally. Press this crease as well, and then unfold so the fabric lies flat on a cutting board.

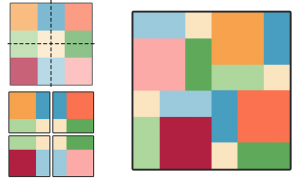
5. CUT TO FORM 4 SMALLER BLOCKS

Using a fabric wheel for preference (it’s really good for straight lines!), cut the block along the crease lines you just created.

This will form 4 smaller sections which can then be rearranged to form a new and more complex block. The original pattern has “disappeared”, to be replaced by an interlocking grid of squares and rectangles.

PREVIOUS TUTORIAL
NEXT TUTORIAL

Contact Us

Got a question? Send us a message, and we'll be in touch asap.

Send Message
Get REJIG news direct to your inbox Subscribe

About the Artist

Rosi Thornton is a visual artist based in Tyne and Wear. Her interests combine pattern, print, colour, and cloth, which she uses creatively in textiles, quilts, printmaking, and handmade books.

She believes passionately in recycling, skill-sharing, and art within communities, and started the REJIG project as a way of drawing these related interests together into a creative whole.

© 2025 · rejig.co