• Home
  • Work
    • REJIG Lockdown Projects
    • Past Projects
  • Blog
  • Tutorials
Luckyfish Arts
  • Home
  • Work
    • REJIG Lockdown Projects
    • Past Projects
  • Blog
  • Tutorials

BLOCK OF THE MONTH

JANUARY: THE SHOO FLY BLOCK

The Shoo Fly pattern has its origins in American patchwork traditions of the 1940s, and its name is derived from a plant with beautiful trumpet-shaped flowers (apparently the blooms give off a smell repellent to insects, hence the name). It is a simple but effective 9-patch block design, which can look very modern and graphic when bold contrast fabrics are used.

Follow along with our instructions here using your own fabrics, or purchase one of our kits for everything you need to make this quick and fun block!

(Extra credit: have a listen to this popular 1940’s track praising a treacle-y pie of the same name!)

Note: When your pieces are ready to be sewn together, make sure to trim them all to the same size to ensure they fit together correctly.

1. ORGANISE AND CUT THE FABRIC YOU'LL NEED

Two colours of fabric are used in this block, which we’re calling a “main” and a “plain”. This can be two contrasting colours, or a plain colour with a pattern. Avoid using fabrics that are too similar or which look visually confusing together. The contrast is really what makes this simple block so bold and effective.

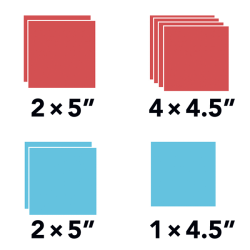
You’ll need to cut out 9 squares:

In the “main” fabric, cut 2 x 5″ squares, and 4 x 4.5″ squares.

In the “plain” fabric, cut 2 x 5″ squares, and 1 x 4.5″ square.


fabric needed

2. MAKE THE CORNER SQUARES

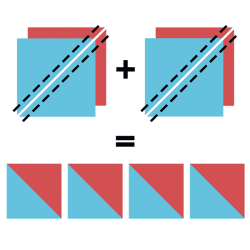
To do this, we’ll be turning the four 5″ squares into half-square triangles.

Place two squares on top of each other, 1 main + 1 plain fabric, and pin the right sides together.

Rule a line from corner to corner using a pencil or tailor’s chalk. On your machine, stitch down either side of the line using your machine’s presser foot as a guide.

Cut in between the sewn lines, and press each set of half-square triangles open with an iron.

Repeat these steps with the two remaining 5″ squares.

Corner blocks

3. LAY OUT THE DESIGN

Before you start stitching anything, it’s important to lay out all of your squares in the correct pattern, right next to your machine, as a visual aid.

This helps you remember which way round everything goes, so you hopefully avoid having to unpick mistakes!

lay out pattern

4. SEW THE SQUARES TOGETHER IN 3 ROWS

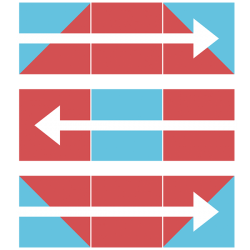
Once you know where everything is going, you can begin to sew the top row of 3 squares together. Once all 3 are joined, iron the seams flat towards the right hand side.

Sew the second row of 3 squares, and press the seams in the opposite direction, to the left.

Sew the final row of 3 squares together, and press the seams to the right.

seam directions

5. SEW THE 3 ROWS TOGETHER

Go carefully and make sure your edges line up. Press the seams firmly as you go. And, you’re done! Your finished block should measure 12″ square.

You can now use this block as part of a larger quilt, or in another small sewing project such as a cushion cover.


complete block
NEXT BLOCK TUTORIAL

Contact Us

Got a question? Send us a message, and we'll be in touch asap.

Send Message
Get REJIG news direct to your inbox Subscribe

About the Artist

Rosi Thornton is a visual artist based in Tyne and Wear. Her interests combine pattern, print, colour, and cloth, which she uses creatively in textiles, quilts, printmaking, and handmade books.

She believes passionately in recycling, skill-sharing, and art within communities, and started the REJIG project as a way of drawing these related interests together into a creative whole.

© 2025 · rejig.co